Quick Reference Guide
Current Mobile App Versions
Apple IOS Version 2.7.5
Android Version 4.1
An easy-to-use data collection tool, WatchSpotter makes collecting data in the field simple and straightforward. Once you have received the project ID from the scientific project lead, you can download and use the WatchSpotter app in just a couple of steps. This quick reference guide covers all of the details of the WatchSpotter mobile app, optimizing your data collection experience.
Scan to download the app from your app store
Click the link below to download the app from your app store


Open the app
Once downloaded, open the WatchSpotter app. Enter the name of the project given to you by your project administrator. Please note, once you sign into a project, you will no longer need to go to this screen.
Once you enter the project ID, the home screen opens to the Interactive Map, pictured on the right. You can move the map to different locations, zoom in and out with the +/- or by manually moving your fingers in and out. The crosshairs show exactly where you are located. If you need to move the crosshairs to where you “SPOT” the item you are collecting data on, simply place your finger on the crosshairs and drag them to the appropriate place on the map.
In the lower right corner there are two buttons. The green plus symbol is a shortcut to add a Spot. The globe symbol allows you to change the appearance of the map. The map’s default appearance is set by the project admin, but there are four available map modes that you can select: Satellite, Light Mode, Dark Mode, and Outdoor.

App Menu
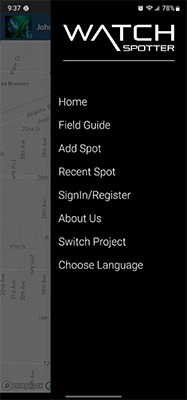
Click on the horizontal lines in the upper right corner of the screen to open the app menu. The options in the menu are as follows:
Home: Opens the home screen.
Field Guide: This contains relevant project data including Species Identification, Hotline Numbers, Data Collection Methodologies. Anything that your project admin feels will help you optimize your field data collection experience.
Add Spot: To add a Spot, choose the location for the Spot. Use your finger to drag the crosshairs to the desired Spot location on the map. The WatchSpotter App will automatically gather the GPS coordinates for the location of the crosshairs and add them to your Spot. This allows for adding Spots that are at a distance from you.
Recent Spot: See a list of the recent Spots with the most recent first. Click on a Spot to view the Spot details including photos.
Settings: If you’re an existing Spotter and you want to change your password, click on Settings in the app menu. You must be logged into your account to change your password. In the settings section, you can change your password, display name, your full name, cell phone number, and date of birth. When you have made changes, scroll down and click Submit.
Sign In/Register: Here you will enter your email and password to sign in and begin adding spots. Your password may be provided to you by your project administrator.
If your project administrator did not supply you with your credentials, click Sign Up and enter your desired display name, your full name, email address, and desired password. When finished, press Submit.
Note: Your project administrator will need to approve you prior to you adding any spots.
About Us: Contains contact information for WatchSpotter support as well as the version that you are using. Always make sure that you are using the most up to date app. Do this by going to the app store and searching “WatchSpotter”, and clicking Update.
Switch Project: Takes you to the project ID screen. If you are involved in more than one WatchSpotter project, you can switch between them here.
Change Language: Enables you to change from the default language (English) to your language of choice. Currently the app is available in English, Spanish, French, German, Norwegian and Swahili. More coming soon

Adding a Spot
Step One: Choose a Category. This is a mandatory field and questions are based on categories. Choose an option from the dropdown menu. Next Choose a Spot Type and Location from the dropdowns. If your project uses Fixed Location and it is appropriate, choose a fixed location.
Notes: If you have any notes, you can enter them here.
(Notes Tip) if you click on the microphone icon on your phone you can speak your notes and your voice will translate into words.
Date and time will automatically be entered. If you need to change the date and time, simply click in the field and edit.
Latitude and Longitude will automatically be entered. If you need to change them, simply click in the field and edit.
Click Next
Step Two: Step two is where you will answer the project questions. If you do not know the answer to a question, leave it blank. You will be prompted to fill it in only if a response is REQUIRED by the administrator. When all questions are answered, click Next.
Step Three: Step three is where you add your photos. Click the gray Browse button. Choose to upload a photo from your device or take a picture with your device’s camera. Once you’ve uploaded your photos scroll down and click Submit. You’ll see a message saying Spot Created Successfully.


